Last Updated on June 1, 2025 by Nico
Ashwagandha is an adaptogenic herb that can help you become more resilient to stress. Tincturing ashwagandha makes preserving and consuming the plant’s medicinal benefits easy. Here’s a simple ashwagandha tincture recipe for stress and immune support.

Ashwagandha (Withania somnifera), also known as Indian ginseng or winter cherry, has a long history of use in herbal medicine. The herb is native to India, North Africa, and parts of the Middle East, and grows well in warm and dry climates.
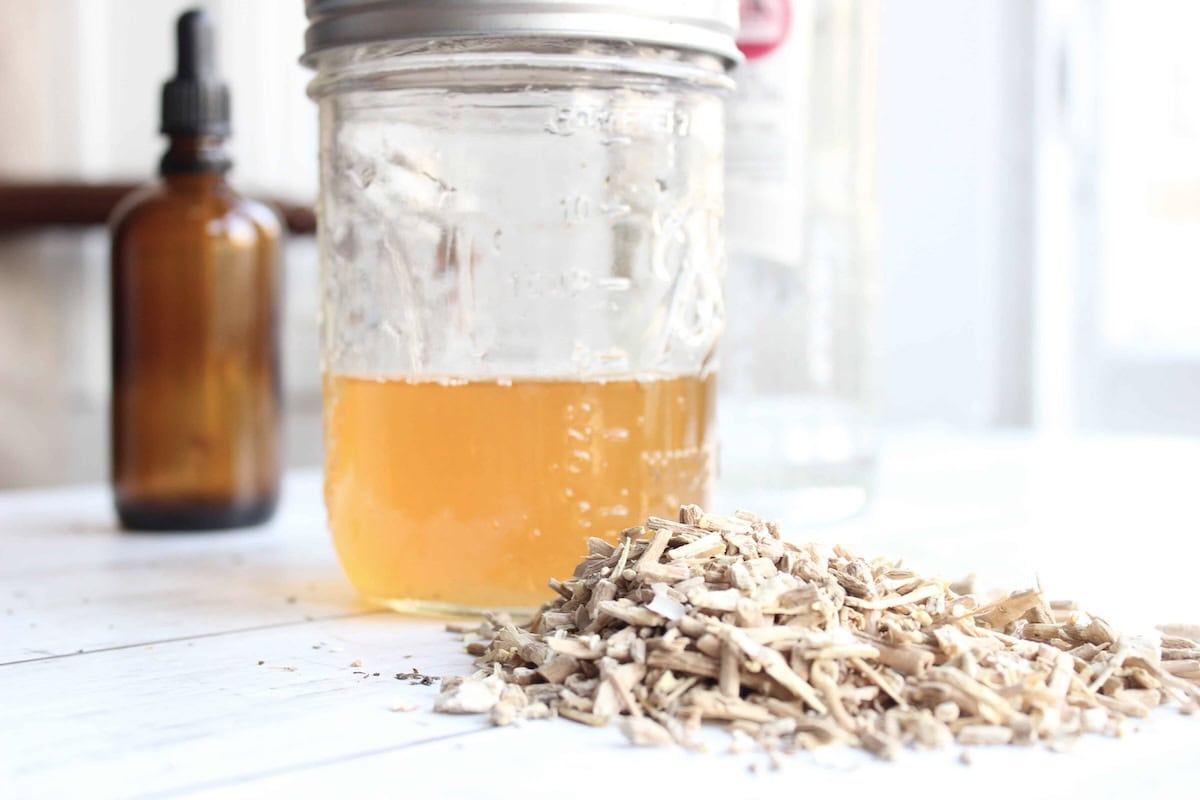
We normally tincture the herb’s roots. They are harvested and dried, and then either ground or chopped for use in teas or tinctures.
In ayurvedic medicine which are traditional herbal practices in India, ashwagandha has been used for over 3,000 years to regulate the body’s stress response and overall health. And in herbal medicine today, ashwagandha continues to be used to support overall well-being and reliance.

Benefits of ashwagandha
Helps with stress resilience – Ashwagandha’s adaptogenic properties help to calm the body’s nervous system, regulate cortisol levels, which is a stress hormone, and regulate overal stress levels.
Supports the immune system – The herb may enhance immune cell activity, which can help the body respond effectively to external stressors and illnesses.
Promotes better sleep – Ashwagandha contains compounds that may reduce anxiety and improve sleep quality.
Improves energy levels – Ashwagandha can reduce fatigue and increase overall vitality.
Enhances cognitive function – Studies suggest that ashwagandha may improve focus, memory, and mental clarity by reducing oxidative stress in the brain.
Reduces joint pain – With its anti-inflammatory properties, ashwagandha may alleviate discomfort in joints caused by inflammation or arthritis.
Chopped or powdered root
I prefer to use chopped ashwagandha root instead of ashwagandha powder because I find the powder too difficult and time-consuming to cleanly strain off. The benefits of using the powder is that the alcohol will be able to extract nutrients from more of the plant because more surface area is exposed. But I still prefer the ease of straining off the chopped roots and the alcohol is still able to extract plenty of nutrition from the chopped roots.
Contraindications
While ashwagandha tincture is generally considered safe, there are a few things to keep in mind. Always speak with your herbalist or other qualified healthcare practitioner before starting a new herbal medicine.
- As with many other herbal remedies, there are few studies on how ashwagandha may impact pregnant or breastfeeding women, so it’s recommended that you avoid it during those times.
- Ashwagandha may interact with medications, particularly sedatives, thyroid medications, or immunosuppressants.
- If you have medical conditions like hyperthyroidism or autoimmune disorders, consult your doctor before use.

Step-by-step guide: ashwagandha tincture recipe
Tools
An airtight container with a tight-fitting lid – I use a glass pint mason jar with parchment paper between the metal lid and tincture or extract to prevent the alcohol from corroding the metal.
Small amber glass bottles with dropper tops – I like these
A fine mesh strainer, cheesecloth, or coffee filter – I like these unbleached ones
A small funnel
Supplies
Dried organic ashwagandha root – I prefer using chopped root rather than powdered root. Here’s a bulk, organic source.
80-proof alcohol (or 40% alcohol) – If you want to avoid alcohol, you can swap out the alcohol for store-bought apple cider vinegar or food-grade glycerin. I buy this bulk raw apple cider vinegar and this vegetable glycerin.
For complete measurements, see the printable recipe card below.
Instructions
Add your chopped or powered ashwagandha root into a clean glass jar. If you’re using chopped root, fill the jar ½ full of the root. If you’re using powdered root, fill your jar about ⅓ full of the powder.

Cover the plant material with 80-proof alcohol. I prefer to use unflavoured vodka to keep the flavour of the final tincture neutral.

Add a lid to the jar and give it a shake to make sure everything is submerged.
After shaking it, add a piece of parchment paper between the lid and glass jar if you’re using a metal lid. Date and label the jar and set it in a cool, dark place for at least 4-6 weeks (I tend to recommend letting it sit for 6-8 weeks to allow the full extraction process to take place).
Aim to shake the jar a few times a week to keep everything moving. If you notice that the alcohol levels are low, you can top it up.

After 8 weeks, use a mesh strainer or cheesecloth to strain off the final tincture. If you used powered ashwagnada, I recommend using a coffee filter or doubled over cheesecloth to strain it off. You can do multiple strains to fully remove the plant material.
Use a funnel to add the tincture to a storage container and date and label the tincture. I like to use amber glass dropper bottles but you can use what you have. That’s it!

How much ashwagandha tincture to use?
Always consult a qualified healthcare practitioner prior to starting a new herbal remedy. I take take this tincture on a regular basis and like to take 1-2 droppers full one to two times a day. You can start small and adjust based on your needs.
How long does the tincture last?
When made with alcohol, ashwagandha tincture can last several years if stored in a cool, dry place out of direct sunlight. A vinegar-based ashwagandha extract should be used within 6 months, while glycerin-based tinctures last up to a year.
How to use the tincture
Directly – You can easily add it to your daily routine by taking the dosage directly under your tongue for quick absorption.
Diluted – You can add a dropperful to water, herbal tea, or cup of morning coffee to dilute the flavour.
How to make this without alcohol
You can simply swap the alcohol for store-bought apple cider vinegar or food-grade glycerin. Vinegar and glycerin aren’t as good as alcohol at extracting the beneficial compounds or preserving them. I like to consume vinegar-based extracts within about 6 months and glycerin-based extracts within a year.
Disclaimer – I’m not a medical professional and do not intend to offer medical advice in any content I create. I offer information for educational purposes and, as always, get your physician’s advice or the advice of your health care provider before trying a new herbal remedy. There are always possible unintended consequences of trying a new herbal remedy such as an allergic reaction or unexpected side effects like interactions with other medications or health conditions.
What to read next
How To Make Turkey Tail Mushroom Tincture (Dual-Extract)
How To Make Rosehip Tincture (Using Rosa Canina)
Save for later

This post may contain affiliate links, which means I make a small commission at no extra cost to you. As an Amazon Associate, I earn from qualifying purchases.
Find us elsewhere…
If you make this how-to and enjoy it, please consider giving it 5 stars. Find me on Instagram @documentingsimpleliving and show me what you’ve made!
Simple Organic Ashwagandha Tincture Recipe (Plus Benefits)
Ingredients
Equipment
Method
- Add your chopped or powered ashwagandha root into a clean glass jar. If you’re using chopped root, fill the jar ½ full of the root. If you’re using powdered root, fill your jar about ⅓ full of the powder.
- Cover the plant material with 80-proof alcohol. I prefer to use unflavoured vodka to keep the flavour of the final tincture neutral.
- Add a lid to the jar and give it a shake to make sure everything is submerged.
- After shaking it, add a piece of parchment paper between the lid and the glass jar if you’re using a metal lid. Date and label the jar and set it in a cool, dark place for at least 4-6 weeks (I tend to recommend letting it sit for 6-8 weeks to allow the full extraction process to take place).
- Aim to shake the jar a few times a week to keep everything moving. If you notice that the alcohol levels are low, you can top it up.
- After 8 weeks, use a mesh strainer or cheesecloth to strain off the final tincture. If you used powered ashwagnada, I recommend using a coffee filter or doubled over cheesecloth to strain it off. You can do multiple strains to fully remove the plant material.
- Use a funnel to add the tincture to a storage container and date and label the tincture. I like to use amber glass dropper bottles but you can use what you have. That’s it!
Leave a Reply